Introduction
Channel combining is by far my favorite step in narrowband processing. It’s one of those steps where you can fully express your creativity and make your image look like no other. In this tutorial, I’ll explain how to do so with the most powerful tool in PixInsight : PixelMath.
Linear or non-linear blending ?
Should you blend linear or non-linear images ? There are two schools of thoughts on this subject. I personally stretch my channels before combining them as it allows me to have greater control over the final image, but I encourage you to read this article from Jon Rista and try for yourself. In this tutorial I’ll be working with stretched images. If you decide to do the same, make sure the background values of your narrowband channels are approximately the same.
Basic combinations
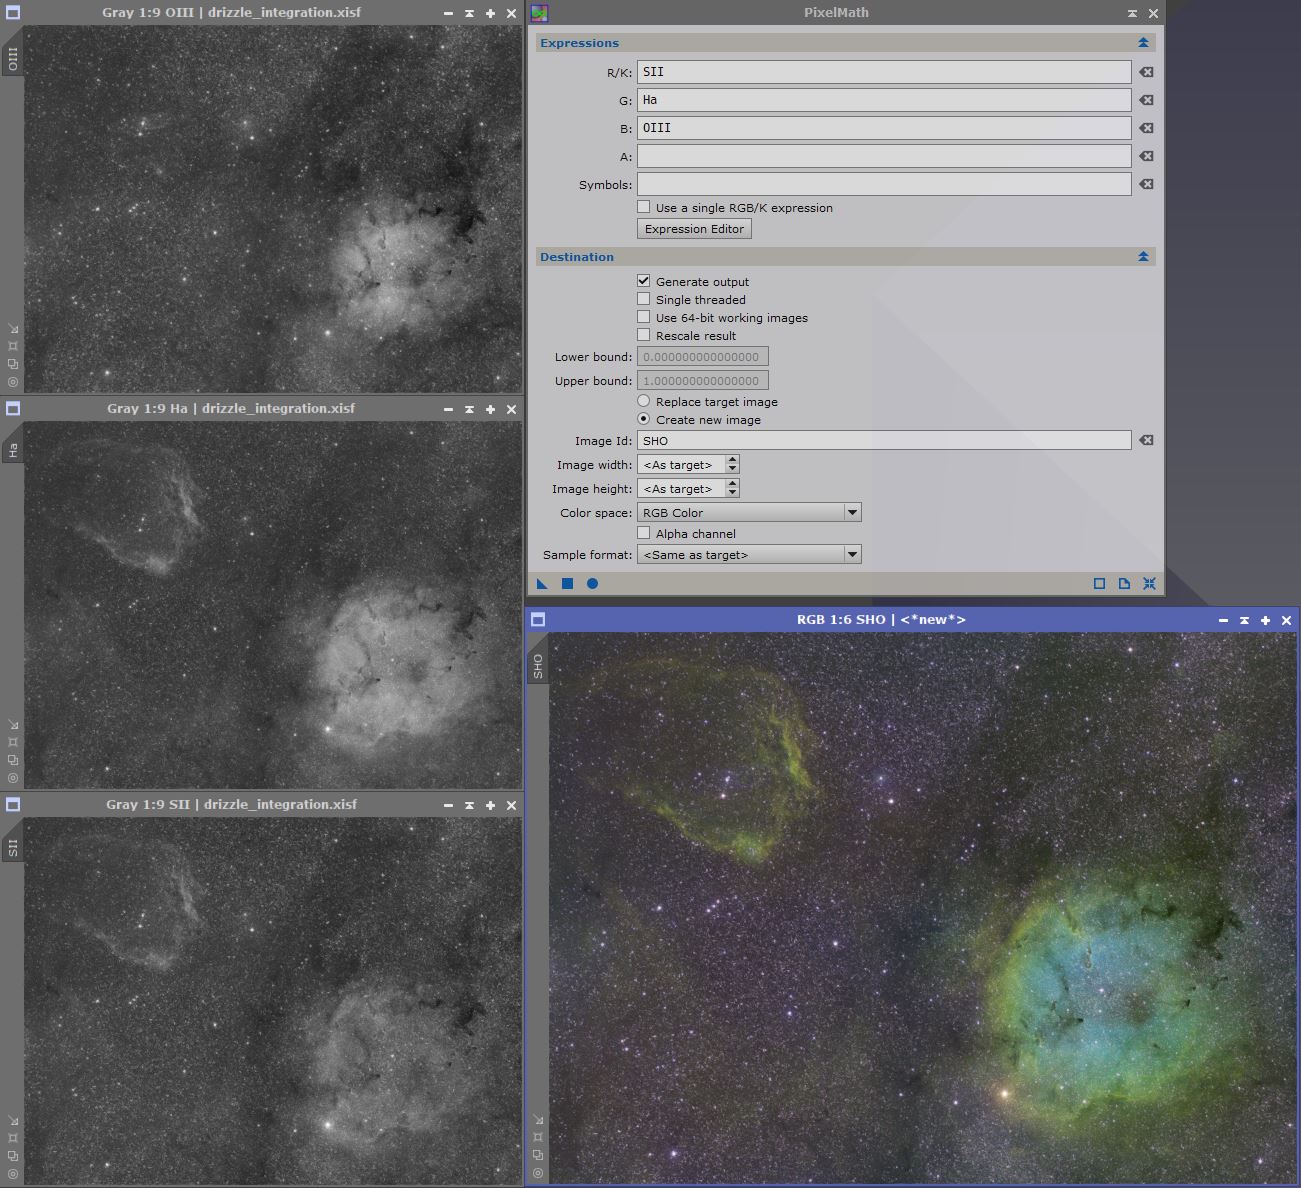
Traditional blends such as SHO, HOO, or HSO are pretty straightforward : each RGB channel is assigned to one of the narrowband channels.
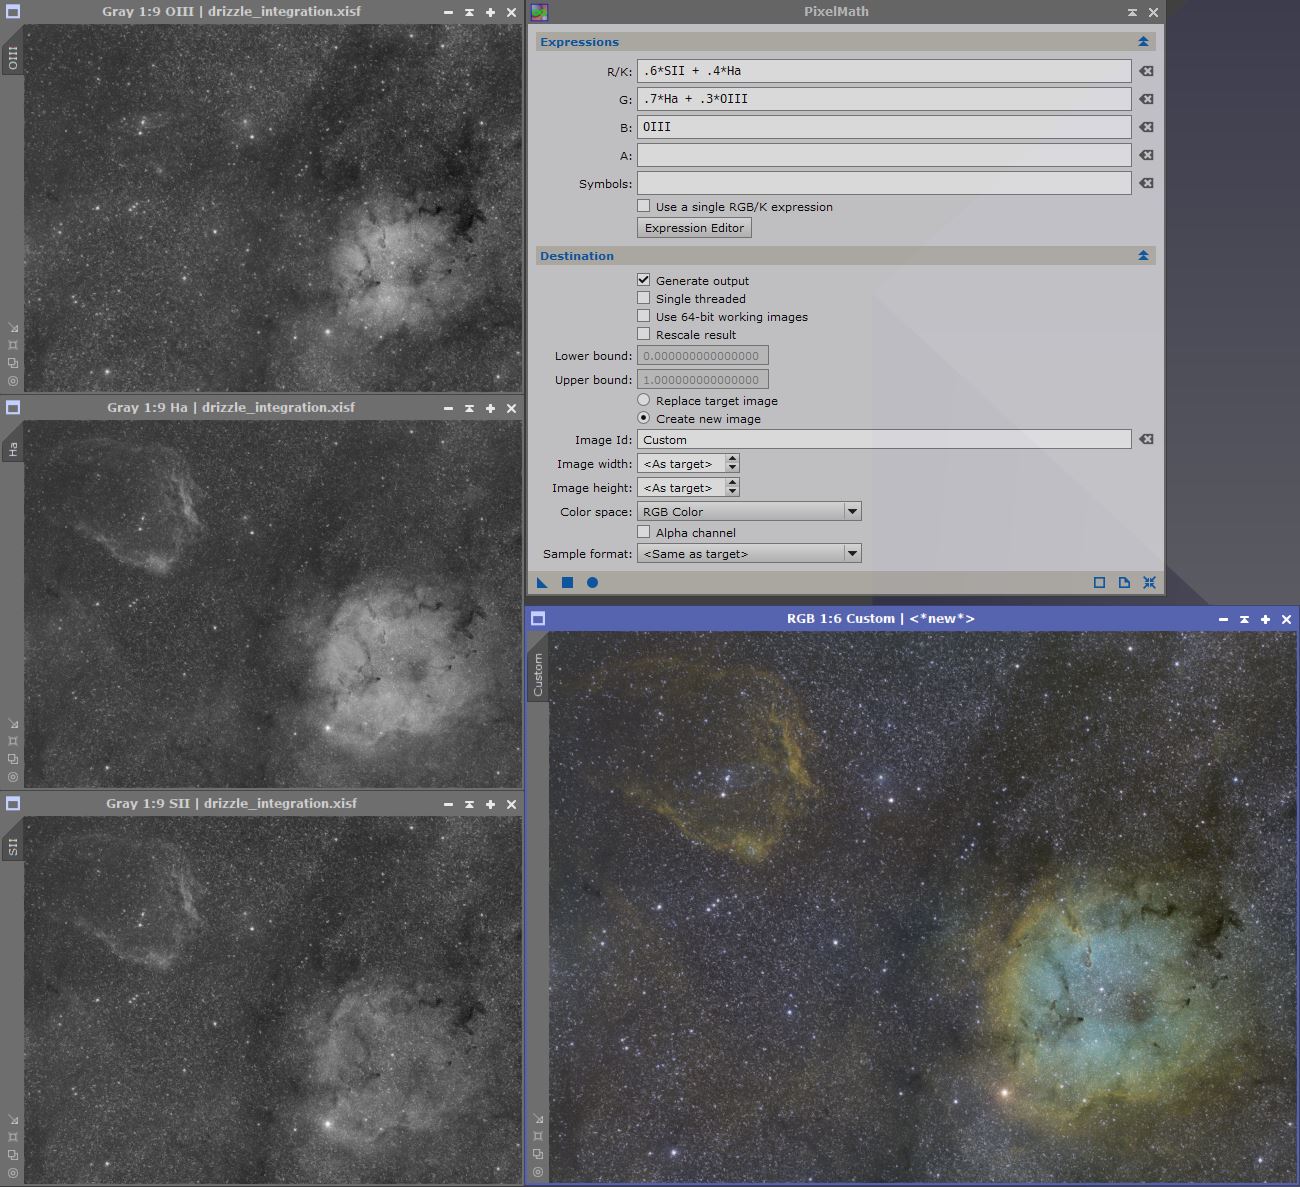
You might be disappointed that the colors don’t look quite like Hubble’s classic gold and cyan. The more advanced combinations that involve mixing the narrowband channels can get you close. Here’s an example :
But if you’re like me, you’re probably still not satisfied.
Dynamic combinations
You might be wondering why I added the word “dynamic” in the title. Let me first explain what a non-dynamic combination is. The last combination mentioned above is what I call a “static” combination : the multiplying factors applied to the narrowband channels are numbers. In the expression for the red channel for example, .6*SII + .4*Ha, the multiplying factors are 0.6 and 0.4. Note that the sum of the multiplying factors is always equal to 1 (it has to be, to avoid clipping the channel).
“How can these multiplying factors not be numbers ?” you might ask. We’ll get there, but first you need to know one thing about manipulating images with PixelMath : each pixel of a monochrome image has a corresponding value in the normalized range [0,1]. Consequently, when you enter a number between 0 and 1 in PixelMath, you’re also entering an image. For example, 0 produces a black image and 1 produces a white image.
Now let’s look at static combinations differently. If you view the multiplying factors as images and not as simple numbers, here’s what the 0.6 multiplying factor look like :
You get a uniform gray image. I can now explain what I mean by “dynamic” combinations : the multiplying factors of a dynamic combination are non-uniform images. I’ll refer to those as “dynamic factors”. The dynamic aspect comes from the fact that, in terms of numbers, there is not only one global factor applied to the whole image, but rather a different factor for each pixel.
The sum of the combination factors still has to be 1, a white image if you prefer. If there are only two factors and the first is called X, you can define the second by using the operator “~”. ~X will return 1 – X, or inverts the image in other terms.
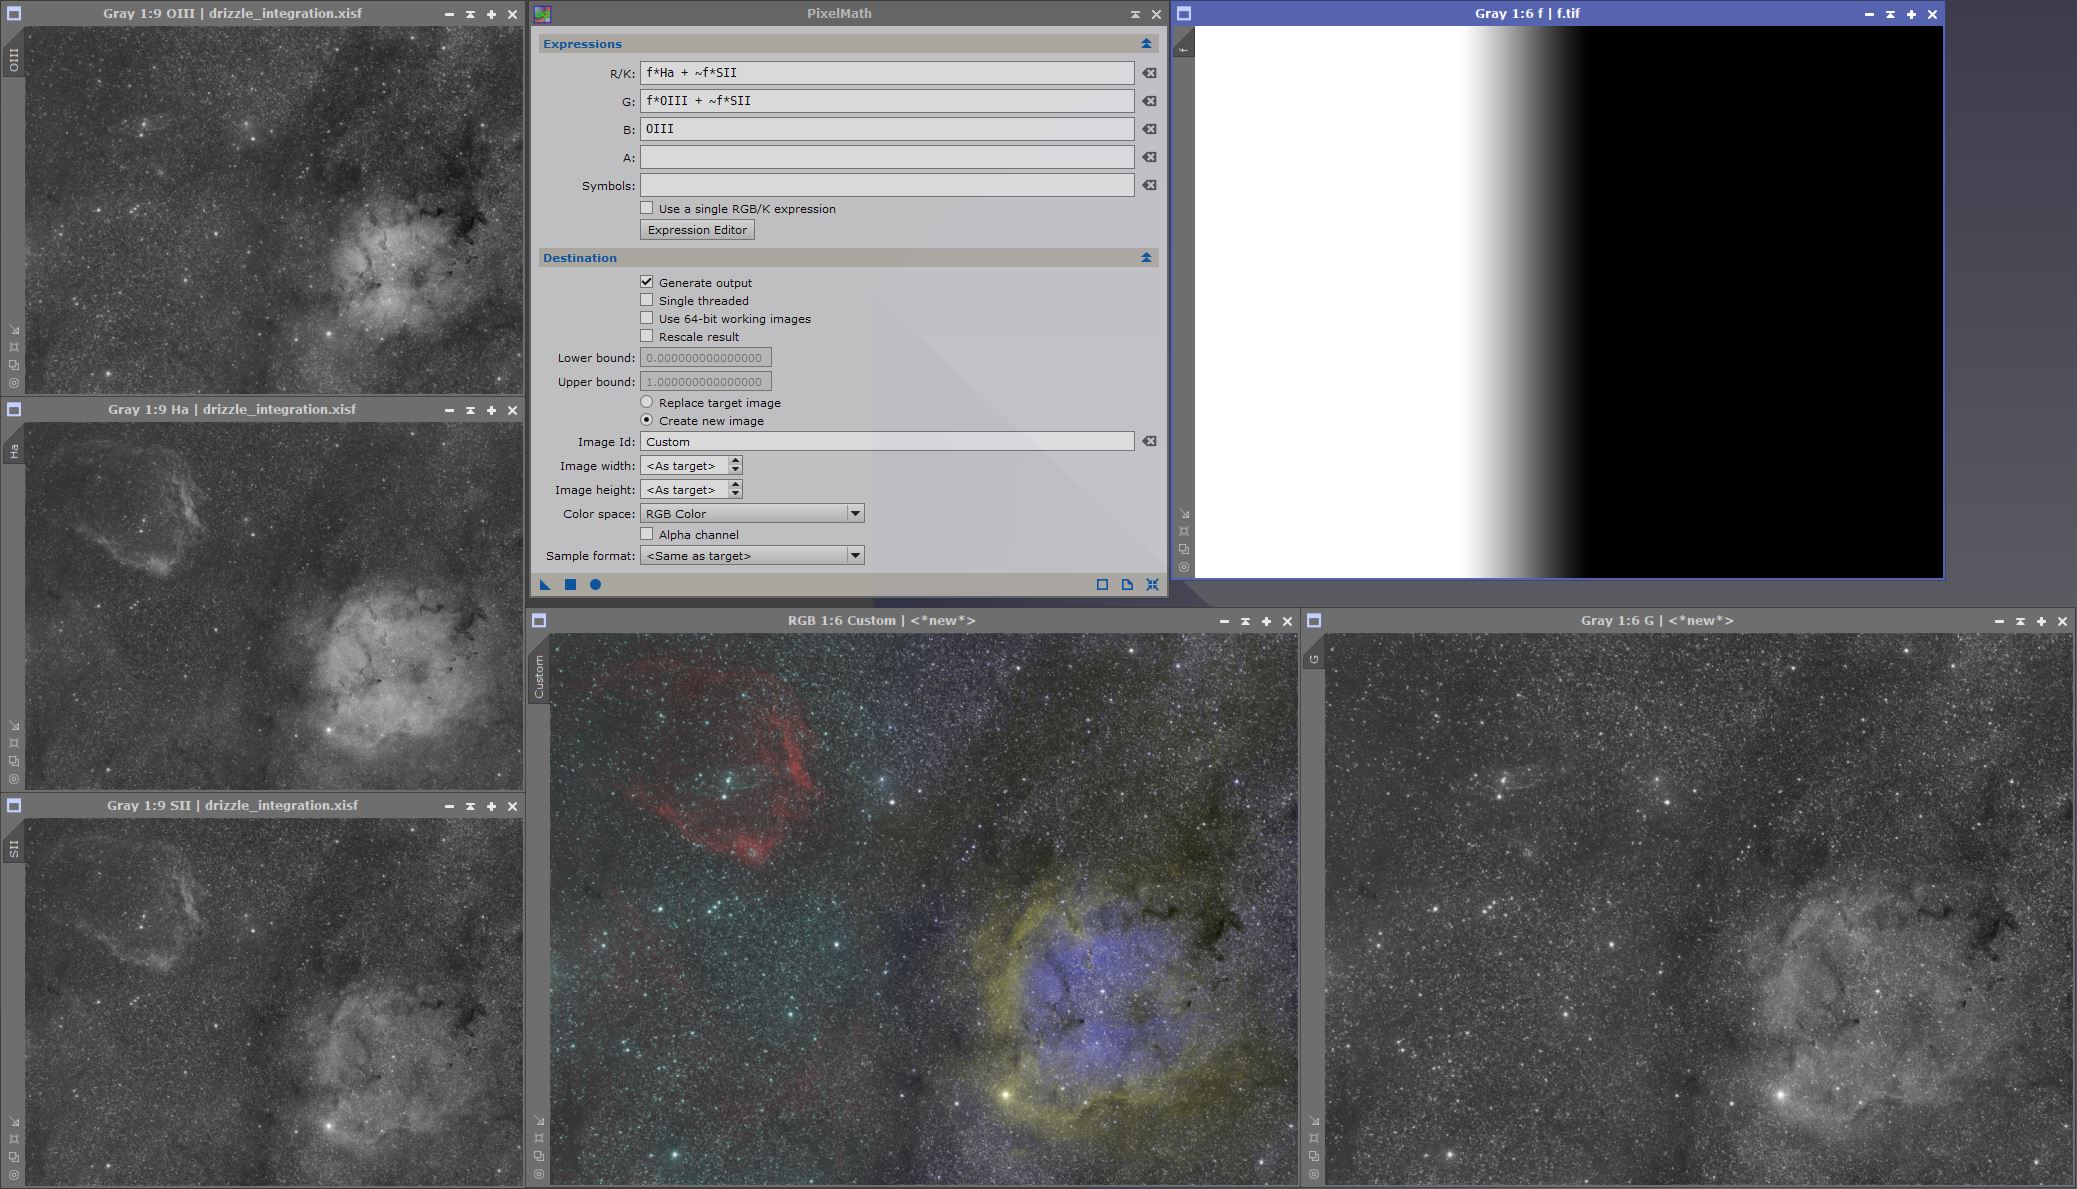
Here’s a simple example of a dynamic combination :
To put it simply, the left part of the image is HOO while the right part is SSO.
This is of course a bad example as the image f (the dynamic factor) was made in Photoshop and isn’t based on any scientific data. Instead, I recommend you to base your dynamic factors on your own narrowband data.
Creating a dynamic factor
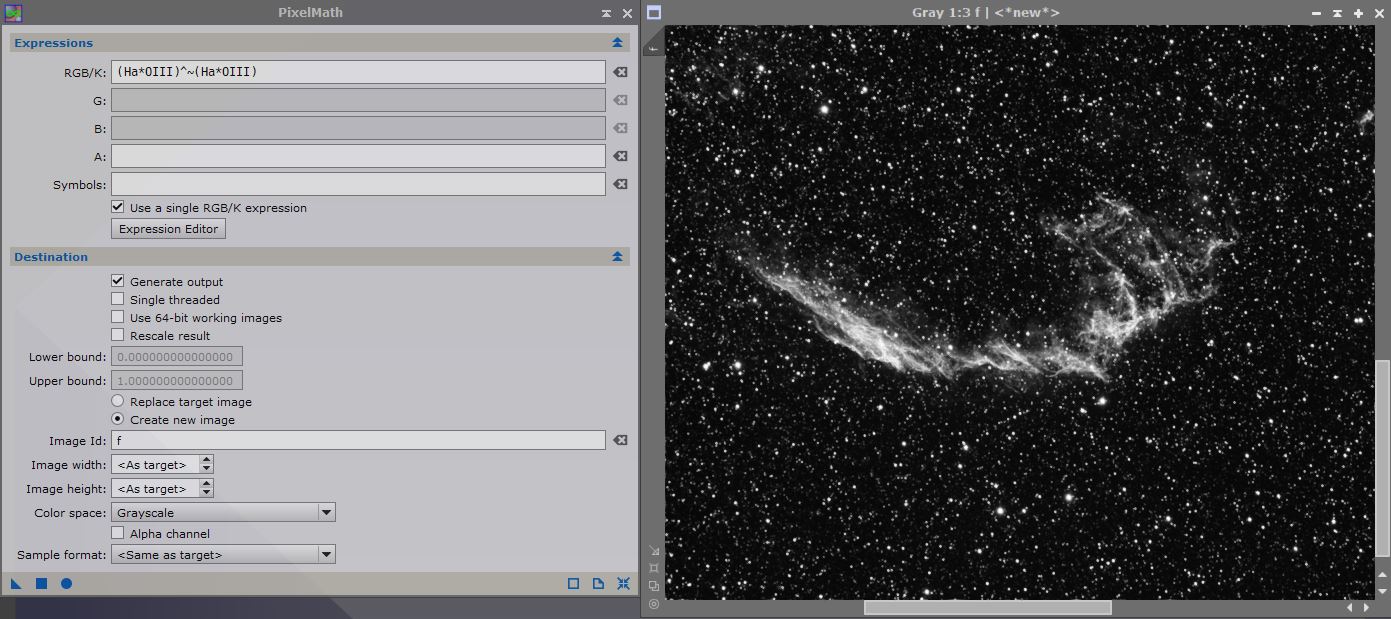
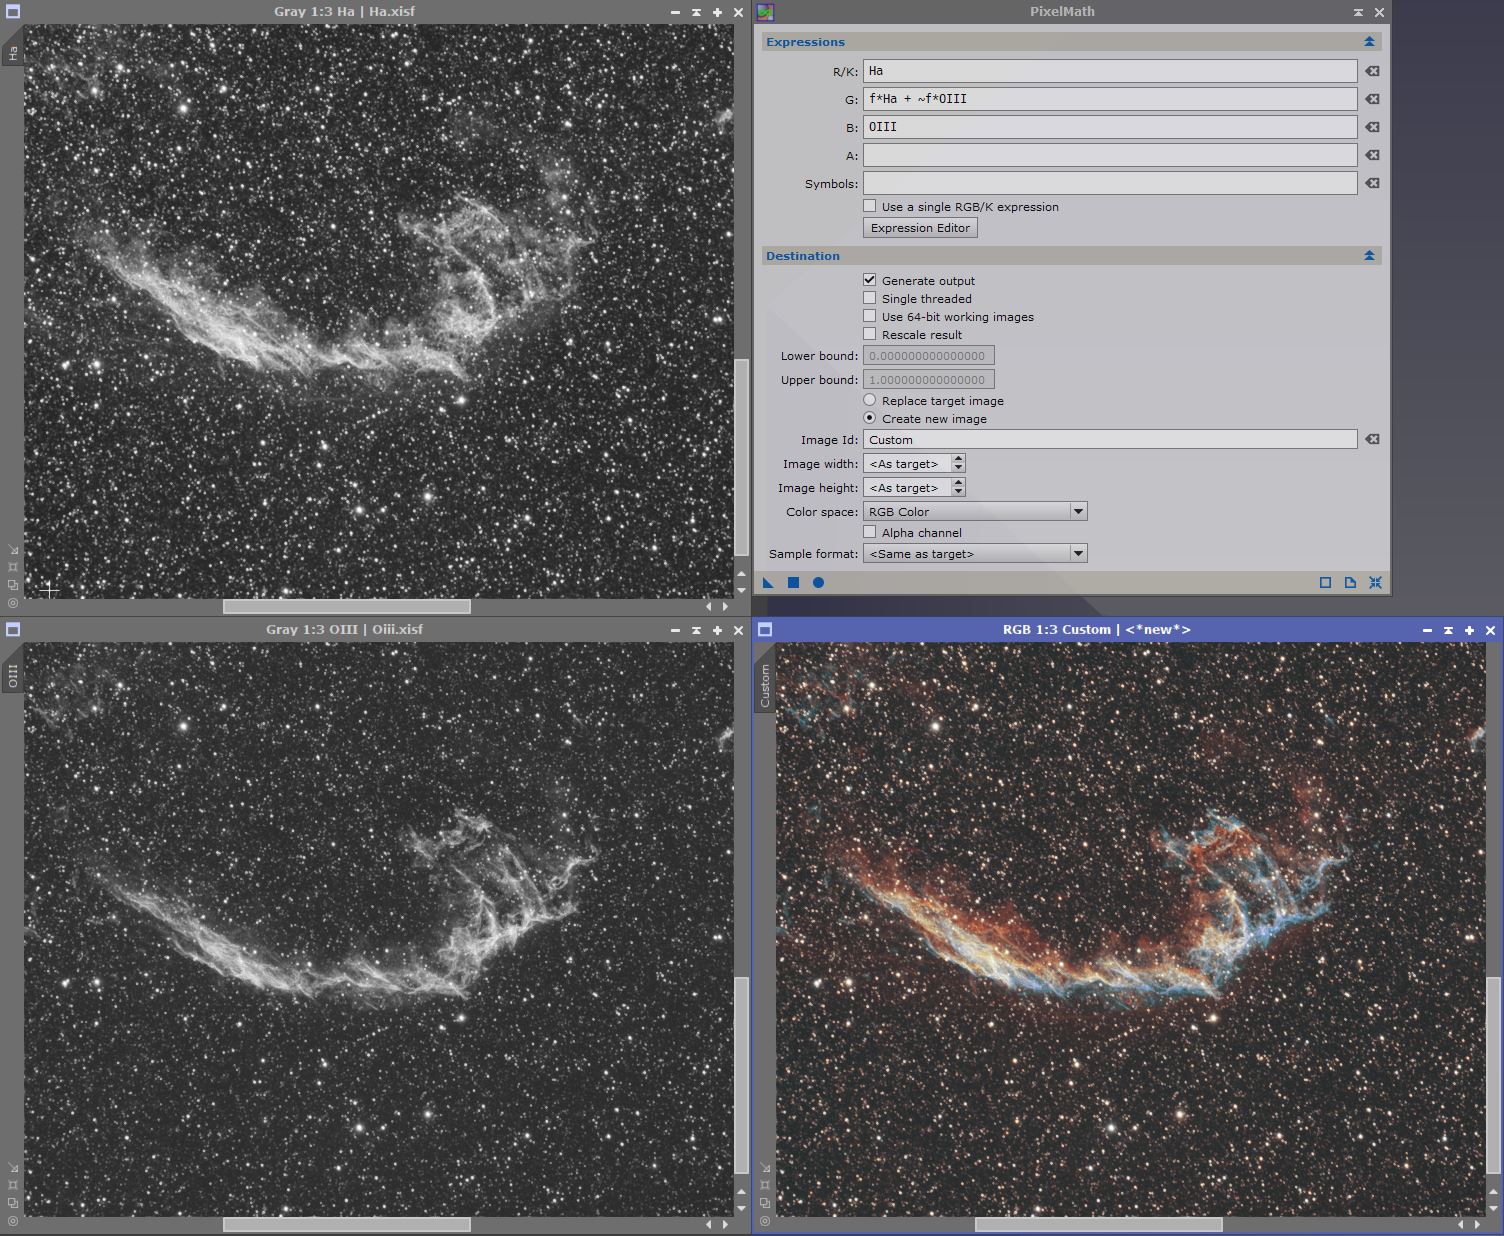
This is the part where you need your images to be stretched. If you still want to combine your channels in the linear phase, you will need to work with stretched copies from now on. I’ll start with an example of a dynamic factor I’ve made for a custom bicolor combination :
The factor f here is Ha*OIII with a PIP transformation (Power of Inverted Pixels) applied to it. Of course, you don’t have to use PixelMath for everything. In that case you could also create the image Ha*OIII and then apply whatever transformation you want using CurvesTransformation instead of the PIP transformation.
Ha*OIII is a good representation of where both the OIII and the Ha signals are strong. Here, I used it to create a synthetic green channel.
Each pixel of the green channel is the result of a custom blend of Ha and OIII (for example : 0.8*OIII + 0.2*Ha) where the factors (0.8 and 0.2) are determined by the intensity of the corresponding pixel in the f image. In other words, the areas where f is black (where either Ha or OIII is weak) are straight HOO while the areas where f is strong (where both Ha and OIII are strong) are closer to HHO.
Here’s a more complex example of a dynamic combination that involves SII data :
Here, the factor is simply a boosted (and stretched!) copy of the OIII image. I will now try to explain what I did for the red channel, since the green channel is very similar to the one presented earlier. The colors I had in mind were a strong red where there is Ha and a strong blue where there is OIII. Of course, there’s Ha everywhere so a simple combination where Ha is mapped to red and OIII to blue would produce purple in the OIII regions. This lead me to this expression for the red channel : f*SII + ~f*Ha, which means in simpler terms “SII where OIII is strong and Ha where OIII is weak”. SII being weaker than Ha, especially in the regions where OIII is strong, implies that the stronger the OIII signal is, the weaker the red channel is. This is how I managed to get a strong blue instead of the typical purple produced by a standard HSO combination.
Some universal expressions
Here are two compact expressions I’ve made that seem to work well on most targets. You don’t need to create the dynamic factors for those ones since they’re already contained in the expressions. You will note that the second one is exactly the same as the one I used for the bicolor example.
Sii/Ha/Oiii :
- R = (Oiii^~Oiii)*Sii + ~(Oiii^~Oiii)*Ha
- G = ((Oiii*Ha)^~(Oiii*Ha))*Ha + ~((Oiii*Ha)^~(Oiii*Ha))*Oiii
- B = Oiii
Ha/Oiii :
- R = Ha
- G = ((Oiii*Ha)^~(Oiii*Ha))*Ha + ~((Oiii*Ha)^~(Oiii*Ha))*Oiii
- B = Oiii
Please credit my website if you end up using one of those expressions!
Extra : luminance layer and color adjustments
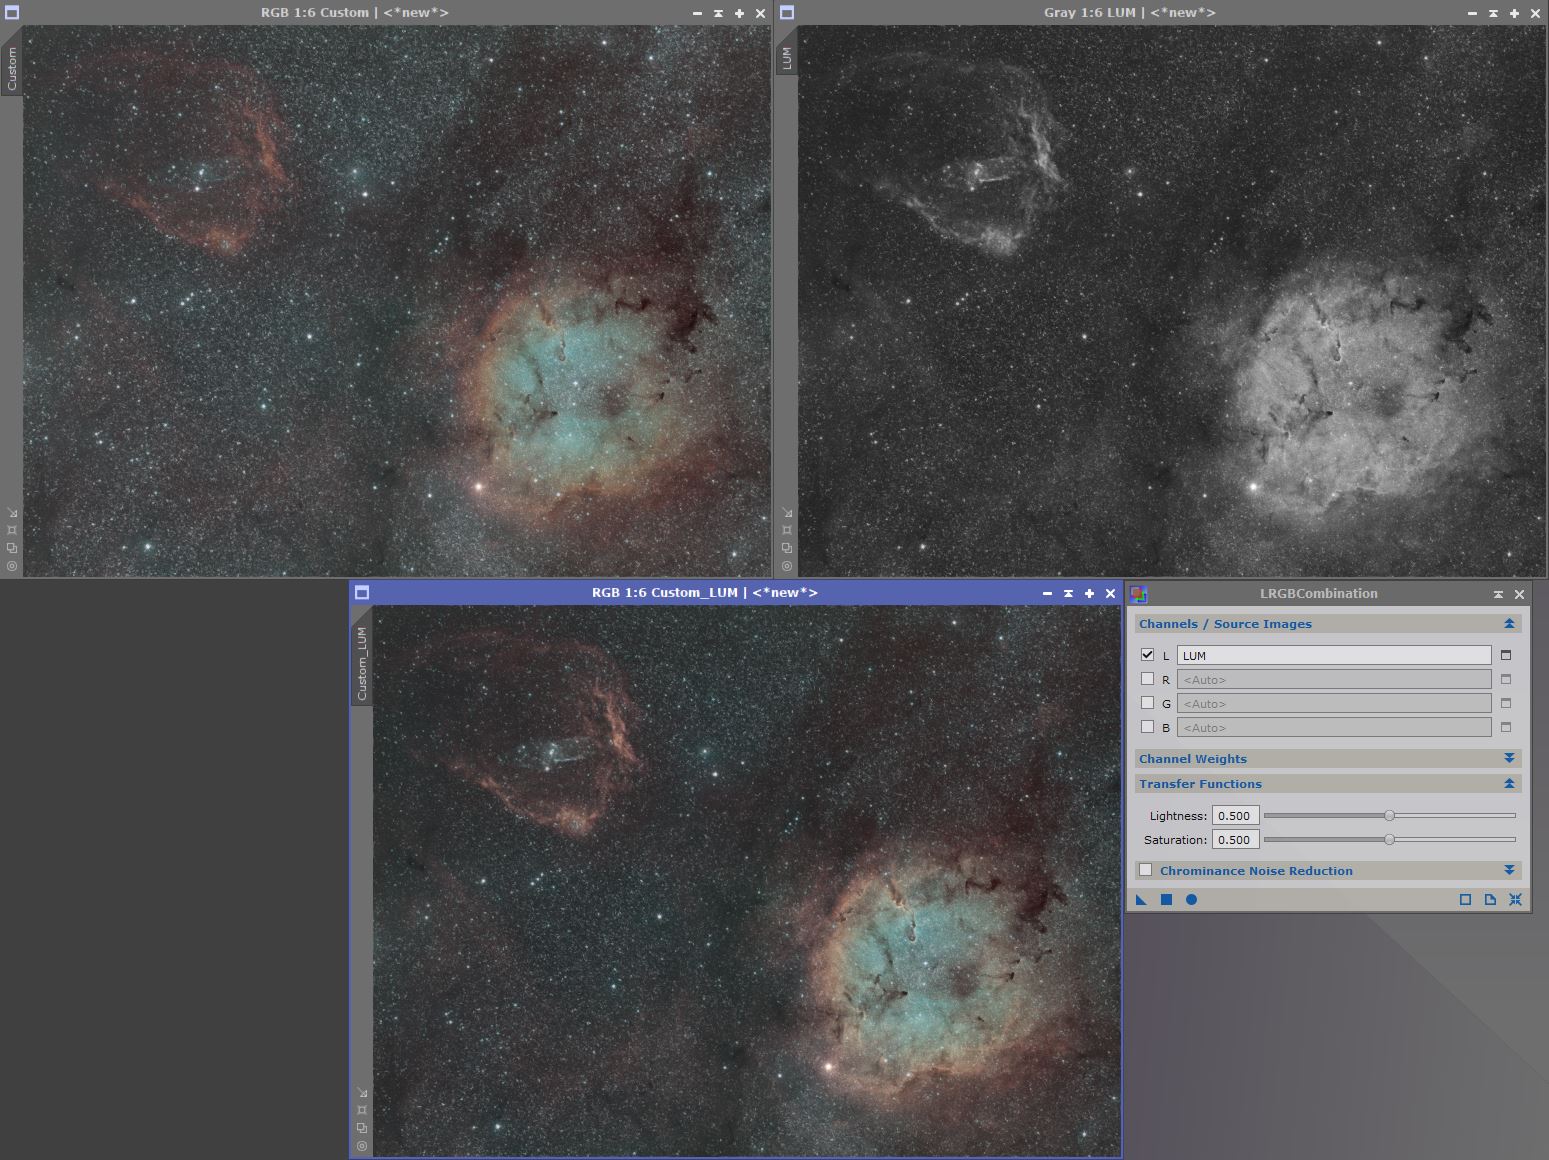
Keep in mind that the resulting image is often far from being the final image. I recommend you to create a separate luminance layer, as it can greatly improve your image (but that’s the subject of another tutorial). Here’s the same image of IC1396 (& friends) with a luminance layer applied to it :
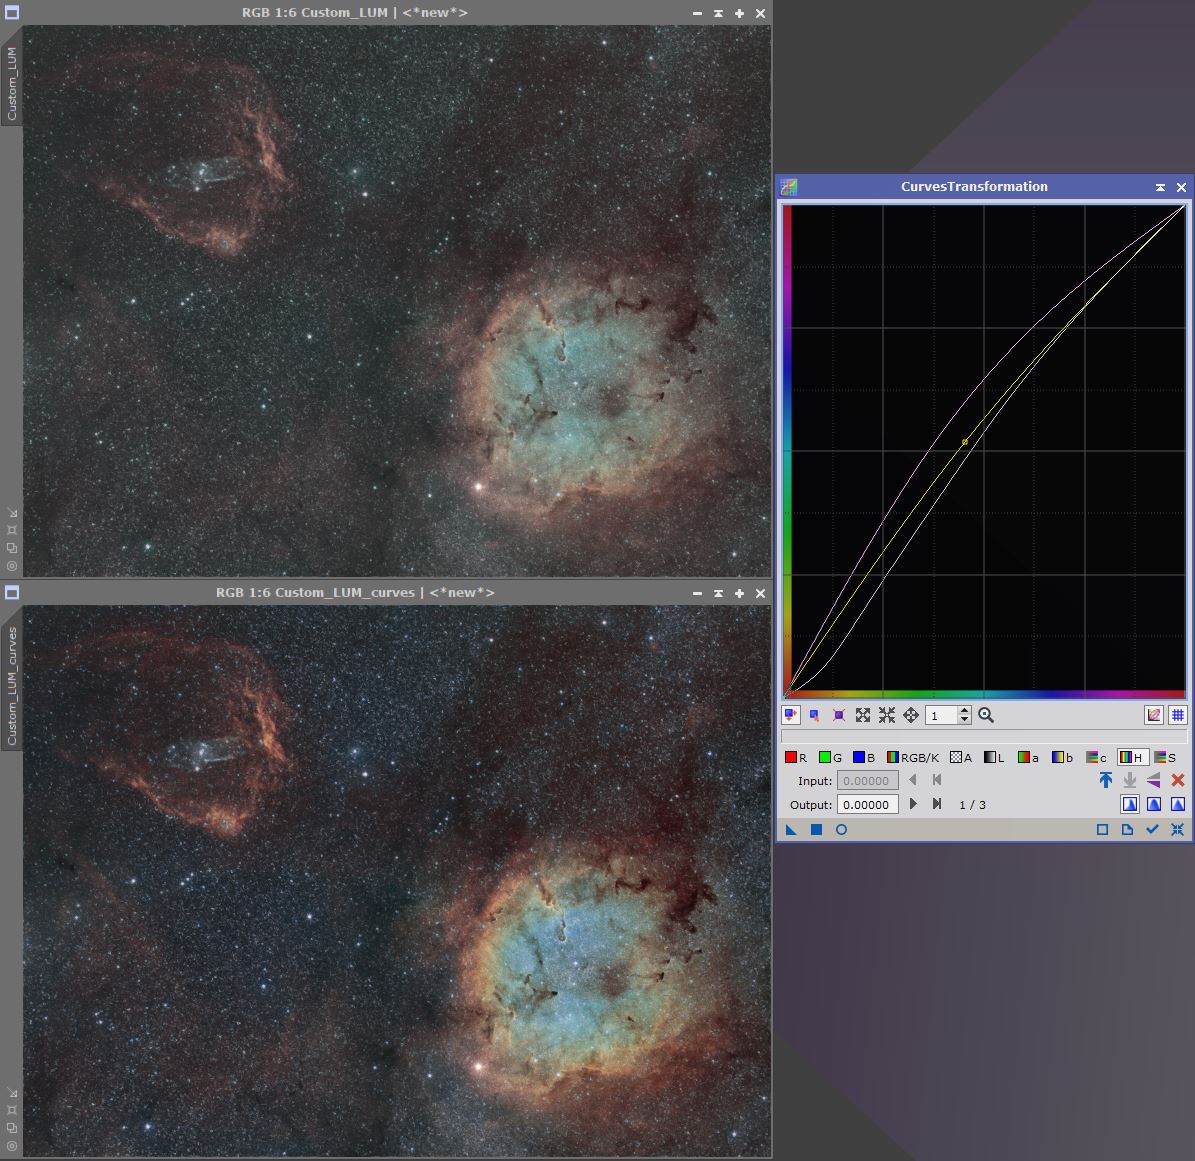
Curves adjustments (Hue in particular) are also almost necessary as fine adjustments with PixelMath can be quite tricky.
Dealing with star color can also be done by using CurvesTransformation with a star mask. If your stars are purple you can also invert the image, apply SCNR (green) with a star mask, and then invert the image again.
This concludes my tutorial on how to do dynamic narrowband combinations with PixelMath. Feel free to contact me on Discord (ForaxX#0335) or Instagram (@thecoldestnights) if you have any questions/comments/suggestions regarding this article.


i absolutely will try this on my IC410 SHO…
thank you so much.
How did you add the < right side up in your expressions ? R = (Oiii^ what is that ?
Thank you! It should be above the 6 on your keyboard.
This very interesting work. Thanks for sharing. Could you point me to some background information on PIP? Something that goes into what it is intended to accomplish and how that goal is accomplished…I guess something technical in bent. Thanks
Thanks! Here’s a video from Adam Block explaining the different exponential transformations : https://youtu.be/ZmML4UekFMg. TLDR : it is a specific transformation that you could achieve with CurvesTransformation. The details are honestly not important but if you want to understand what you’re doing I’d recommend creating the dynamic factor f separately using CurvesTransformation (as described in the tutorial) instead of using the all-in-one PixelMath expressions.
That helped!
Mitch,
(Oiii^~Oiii) means 0iii raised to the inverse of Oiii
^ is the exponent operator
~ is the inverse (1/Oiii) operator
Is it really the inverse (1/OIII) operator or rather the inverse (1-OIII) operator ?
It is 1-x indeed!
Great tutorial and new perspectives on the usage of Pixel Math that I’ve used twice already…referring to this web page on both occasions (clouds and rain being the main obstacle….).
Thank you!
Very helpful tutorial. I hope you keep writing them.
Thank you!
Thanks for writing this tutorial. I’ve looked at it briefly from time to time but I didn’t completely understand the basic principles behind the expressions. I finally took the time to read through this tutorial and understand how dynamic combinations work. It is simple yet brilliant.
Wow, this is really cool and something I would have never imagined on my own. I didn’t understand most of it because this whole hobby is way over my head, but I cant wait to tinker around with the incredible info you have provided. Thank you.
Thank you! I hope you get something out of it!
Excellent Tutorial! I’ve been passing this link around to many friends.
Thank you very much! Glad to see you here, I love your work!
Really great stuff – I was able to apply some modified versions of what you show here immediately. I think I understand what is going on, although I will have to study all the PixelMath operators used in more detail. I wanted to not only credit your website and tutorial but perhaps also mention you by name in my Astrobin post where I am posting a NA Nebula image where I used these principles, but I cannot find your name anywhere on your website. Assuming that is intentional, but if you care to share even your first name I will add it to my completed AB post along with links to your amazing work here and this informative tutorial.
Thanks! I’m glad the tutorial helped. And thank you for crediting me, I really appreciate it. My name is Ludo if you want to mention it 🙂
Ludo,
Excellent, thanks!
This is just INSANE ! Incredible, just MASTERPIECE formula. Just had the chance to test them out on my NB… waooo, jaw-dropping. Thank you THE COLDEST NIGHTS !
Thank you!
Is this for mono shots only? I split my OSC RGB and tried them in pixelmath, but the look to turn out the same color, albeit slightly different.
You can never truly emulate mono narrowband data out of OSC data. However, the result should not be too similar to what you already had. Make sure the channels are stretched when you combine them in PixelMath.
They are stretched. I split my color photo to R G B channels then do the pixelmath correct?
Amazing tutorial. Used your palette for my first ever SHO shot and it turned out amazing!!
Credited you on my instagram!
Thank you!
Hi, well on a second reading I got this right. Keys for me was to make sure this was to be done in stretched images, and, stretch the O-III for all you are worth… I use GHS. I did this Sh2 86 image also (of course) destarred and denoised and gave this site credit for masterminding the operation:
https://www.astrobin.com/er9zn4/
Thanks for the fine work…
Really nice image, well done! And thank you for your comment 🙂
You method is very clear once you understand what the f image is doing… duh. Things like this you need to read twice at least.
I used the Ha as a false L… some have said (maybe you) to add 60% Ha and 40% O-III but there is so little O-III here.
I also use D3-LUT to manipulate the colors a bit, have a nice in cinema, and that seems to be the standard for giving film a “look”….
I would strongly encourage the use of GHS to crank up those NB images… anyway was a lot of fun for one afternoon… have a list of additional objects to do… finished the Sharpless series and redoing some old efforts plus some LBN suggested by Garry Imm…
Thanks again for the effort!
I learned about this technique a few weeks ago. It took me a while to understand what the “f” image is intended to do. Once I figured that out, I went ahead and reprocessed my NGC 6888 and I was extremely pleased with the result I got. Thanks for taking the time to develop sharing this technique!! It will definitely be part of my image processing toolbox from now on.
CS,
Wanda
Thank you for your comment!
Incredible work!
Do you have any ideas how to boost faint Oiii signal (for the blue channel) without overstretching it?
Thank you very much for this wondeful tutorial!
Thank you! If it is an extended object, I would suggest the multiscale technique from RBA (deepskycolors.com), but it seems like the tutorial is currently unavailable. The idea is to create an image containing only the large scale components using MMT, stretch it, and then merge it with your original image. The PixelMath expression should look like “image – large + large_stretched”.
I am a bit late to the party! I heard of Foraxx palette only this year and only last night noted someone talk about the script in PixInsight. One thing lead to another and I installed it. I did a run on some data that I had from last year and although I should have played with it more I found that I half liked it. (Joke!). I opted for a quick compromise and mixed the result with my previous SHO image. I liked it better. For sure I will play more with this script whenever I can get the weather for new images. Thanks for making it available – those of us not so nimble with Pixelmath really do appreciate such helping hands. (The link to my website will bring you to the composite (Foraxx/SHO) image …..just above the original SHO image.
Thank you for your comment! I love what you did with the colors on your Sh2-132 image, great job! Just a quick FYI, the script you’re referring to was not made by me, but by Paulyman Astro.
OK – Got that…….and thanks for YOUR comment……much appreciated.
Thank you for this tutorial – Your explanations were clear and easy to understand, providing me with a great starting point to use pixel math to combine my channels going forward. I just posted an image of SH2-155 on astrobin, using the formulas you provided as a starting point. As a newbie at this, I was very happy with the results.
Thank you for your comment!
A great job done, however I still can’t acquire Pixinsight, I’m just starting out and I only use Siril a little, can this technique be applied in Siril that already has Pixelmath? Should I make any adjustments? Thank you and congratulations for your splendid work.
Thank you for your comment! The method should work on Siril, yes. The syntax could be different though, so the expressions might need some adjustements (the ^ and ~ operators in particular)
This is brilliant. Would i be right to assume that your modified sho is basically the same as forrax?
Thanks! You’re right. The “ForaxX palette” is the modified SHO example I made for the tutorial. People started calling it that because ForaxX is my username on Discord.
Looks amazing. Thanks for sharing
I’m glad I found your website. I have been struggling with getting good color from Narrowband images and knew about dynamic narrowband combinations. What I really needed was some logic behind why the expressions are what they are and what they represent. This is very helpful.
Thank you!